"When I plugged WD external hard drive into the USB port, the white light turns on at once but the drive was not detected by the computer."
Some users encountered this situation and nothing works even though they plugged in another WD hard drive. If you have similar problems, solutions in the post will help you out.
No matter which way you choose to fix the problem, remember to download and use FonePaw Hard Drive Recovery to retrieve your data from WD external hard drive (opens new window). If you want to find your data quickly, navigate to the last part of the post.
Video Tutorial: How to Recover Data from Hard Drive
Quick Fix WD External Hard Drive Light On but Not Working
If your Western Digital (WD) external hard drive cannot be recognized by your computer while the light is on or suddenly not working on your PC, don't worry, you can try to follow the following three methods to quickly fix the problem.
Clean Up the Virus that Stops WD External Hard Drive from Working Properly
If there is virus in your computer or WD external hard drive, it may also cause the hard drive to not work properly. So make sure to clean up all the virus or malware on your PC and WD external hard drive before trying to connect the WD external hard drive to PC again.
Test the WD External Hard Drive Angain after Changing the USB Cable
Sometimes, the computer can’t recognize your WD external hard drive because there is something dirty on your computer’s USB port or USB cable. So you can try to clean the USB port first, or change the USB port, or connect it using a different USB cable to check if the WD external hard drive show up on your PC now.
Turn On the USB Root Hub to see if the WD External Hard Drive shows up on PC
Step 1.Click Start, and then type "devmgmt.msc" and hit Enter.
Step 2.Open Device Manager > Expand Universal Serial Bus controllers.
Step 3.Right-click on USB Root Hub, and then Click Properties and Power Management.
Step 4.Uncheck "Allow the computer to turn off this device to save power".
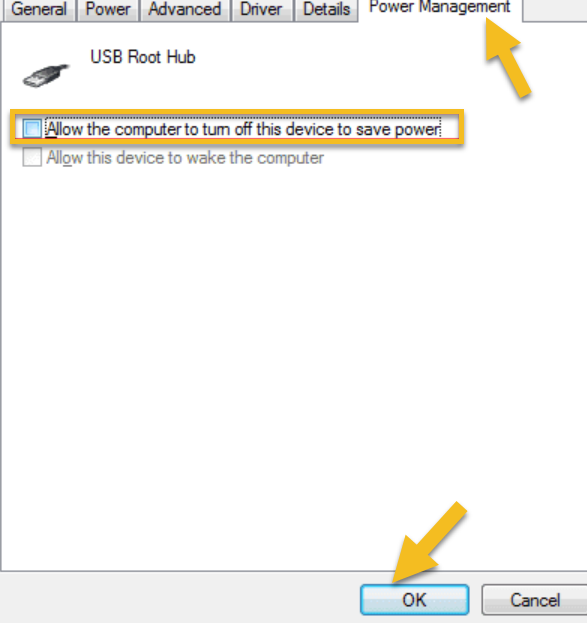
Repeat the steps mentioned above to turn on all the USB Root Hubs in the list and reboot the PC. Then, see whether the WD external hard drive now shows up on your PC or not.
Fix WD External Hard Drive Blinking but Not Working on Windows
For Windows users, the common factors that lead to this error include virus attack, partition issue, driver issue, or wrong file system.
Solution 1 Show the hidden devices
If the light blinks when you insert the WD external hard drive into the computer, that means it can be detected by the PC but it is hidden. To fix this problem, you can unhide all hidden devices.
First, type devmgmt.msc in the search box and hit Enter.
Second, in the Device Manager, click on the View tab > Show hidden devices.
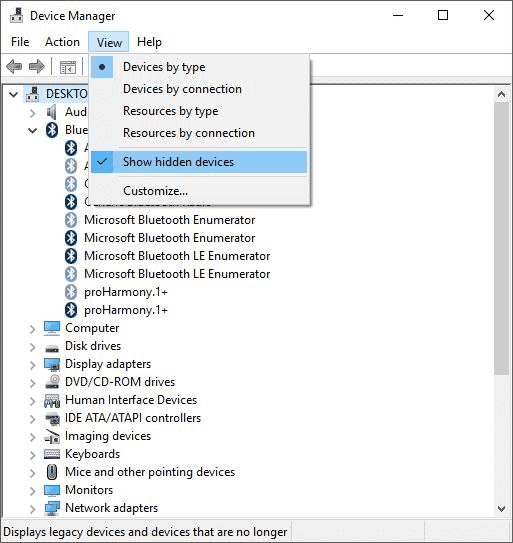
Third, reboot the computer and insert the WD external drive into the computer again to see if it is shown up.
 Tip
Tip- If your computer system is Windows 10, you can type in Show hidden devices in the search box. It will navigate to the target directly.
Solution 2 Uninstall WD external drive and connect it again
First, type in devmgmt.msc and press Enter.
Second, expand Universal Serial Universal Serial Bus controllers and right-click on each USB device > Uninstall. Check whether there is an unrecognizable drive or not, if there is any, uninstall it.
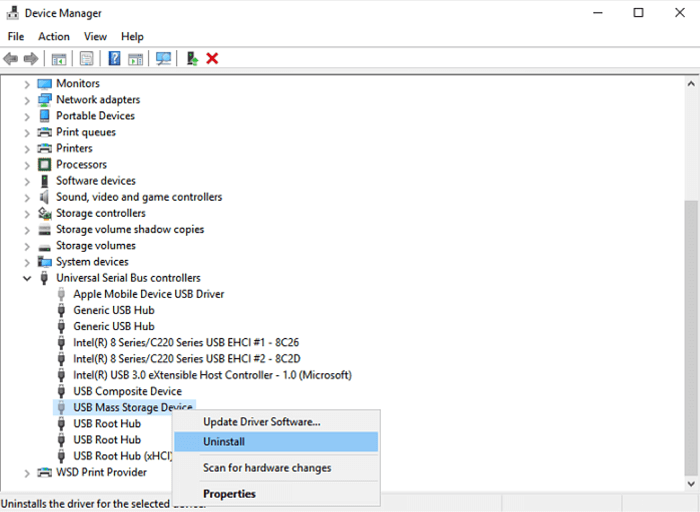
Third, go to This PC/My Computer and check for the external drive, if it doesn't show up, restart the PC and reconnect the WD external hard drive.
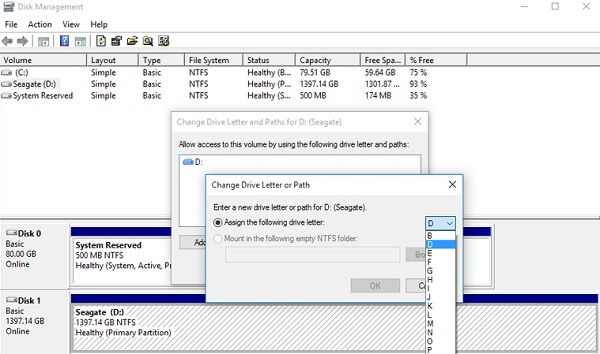
Solution 3 Change the drive letter to make WD external hard drive show up
Step 1. Type in Disk Management in the search box.
Step 2. Find and right-click on the WD external hard drive > select Change Drive Letter and Paths…
Step 3. Assign a new letter to your WD external hard drive and save the change. Now you should see it on your computer.
Solution 4 Change Registry
Modify the Registry is another way to fix the problem but it may be a little complicated to computer novices.
Step 1. Type in regedt32 in the search box > OK.
Step 2. In the left side menu, select HKEY_LOCAL_MACHINE > SYSTEM > CurrentControlSet > Control > Class > {4D36E967-E325-11CE-BFC1-08002BE10318}.
Step 3. Delete upper filter or lower filter and retry the external drive.
Solution 5 Partition the WD external hard drive
This should be the last resort you try because partition the external hard drive will cause data loss. If you have stored a lot of important data on it, you should be careful before you use this method. And if by any chance you lose the data, stop using the external hard drive, and use FonePaw Hard Drive Recovery to retrieve your data.
Step 1. Press Windows key + R at the same time to open the Run box.
Step 2. Type in diskmgmt.msc and click OK.
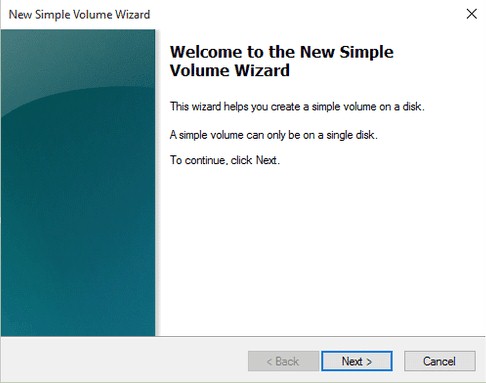
Step 3. Right-click on the unallocated area > New Simple Volume.
Step 4. Follow the wizard to finish the partition.
Your data will be gone after the partition, but don't worry, you can use FonePaw Data Recovery to restore the missing files.
Fix WD External Hard Drive Not Accessible with Light on Mac
To fix the problem on Mac is a little different from the solutions on Windows, follow the solutions below to solve the problem.
Solution 1 Show the WD hard drive in the Finder and Desktop
If the light is blinking on Mac, that means the WD external hard drive is detected by macOS. But it is not set to show up on Mac. Thus, you can access the WD external hard drive by changing the settings.
Step 1. Go to Finder > Preferences > General. Tick the "External disks" option.
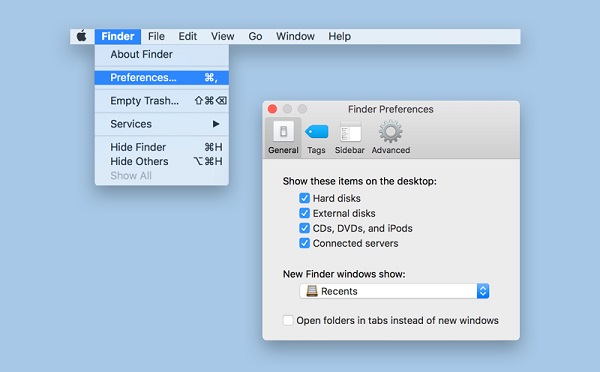
Step 2. From the Sidebar tab on the top, make sure the "External disks" is ticked as well. The steps make the WD hard drive show up on the Finder and Desktop, if it is not working, move on to the next advanced solutions.
Solution 2 Update the incompatible WD programs.
Western Digital has much self-developed software like WD Drive Utilities for Mac, WD Security for Mac, etc. If it can be connected to the computer but you are unable to use the drive, that's because your Mac doesn't recognize the incompatible WD software. In this case, you can make the WD program up to date.
Solution 3 Check if the WD hard drive is locked
If the WD hard drive is password protected, macOS won't read the partition information and mount the volumes. To make it workable again, download the WD discovery to unlock the WD hard drive.
 Note
Note- WD discovery provides cloud base method of delivering software updates and notifications for external USB drives. You can download it manually.
Solution 4 Repair the WD external hard drive in Disk Utility
If you find your Western Digital external hard drive is not encrypted, then the problem may be because the macOS system fails to access the partition and file system information. In this case, you can repair the error in Disk Utility.
Step 1. Go to Applications > Disk Utility.
Step 2. Click View > Show All Devices.
Step 3. Select the WD hard drive from the sidebar and click on First Aid on the top.
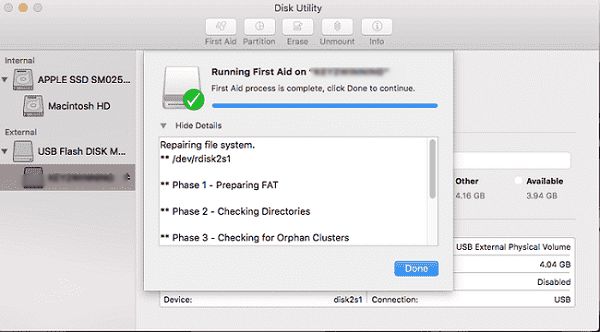
It will verify and fix the possible errors of the WD hard drive.
Recover Data from WD External Hard Drive
No matter which way you choose to fix the error, it is inevitable that you may lose data during the processes. Or, if you cannot fix the problem but you need the data in a hurry, a data recovery program like FonePaw Hard Drive Recovery should be helpful to you.
Download it first and check whether it shows your WD external hard drive or not. If it does, then you can not only access your data directly but also restore the missing data in one click.
Step 1 Scan for the WD external hard drive
Enable FonePaw Hard Drive Recovery and connect your WD external hard drive to your computer. If the software can detect your drive, it should be shown in the Removable Drives.
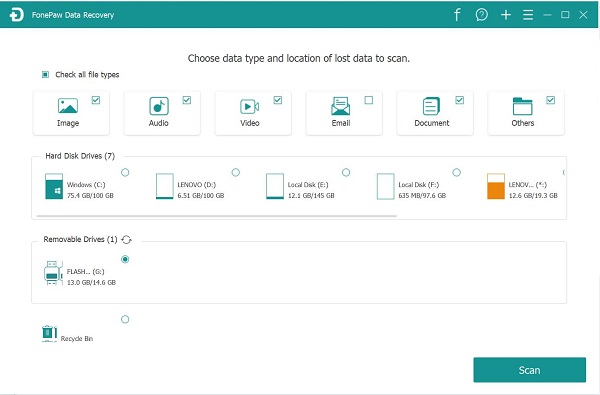
Select the file type and the drive then click Scan.
Step 2 Select the data in the scan result
After the quick scanning, you will find all kinds of data in your external hard drive shows up in the scan result. It is categorized by type list and path list. You can preview the pictures or other file names to choose the data you want.
Can't find the data you want? Try the deep scanning.
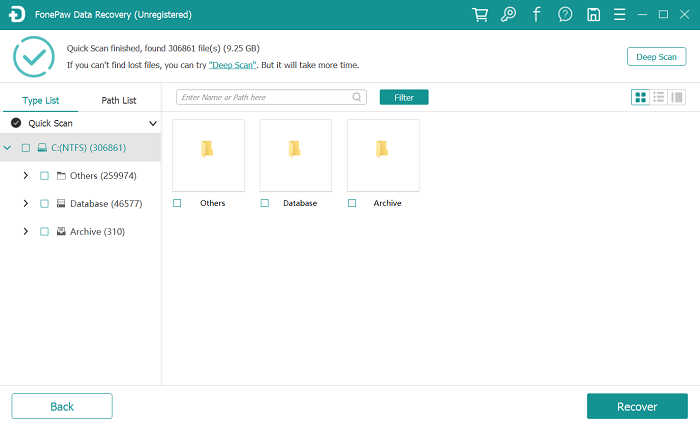
Click Recover to restore the data.
Step 3 Recover and save the data on your computer
Browse and select a path to save the data. Do Not save the data on your external hard drive. Wait for the process to finish and you will find the data you need on your computer.
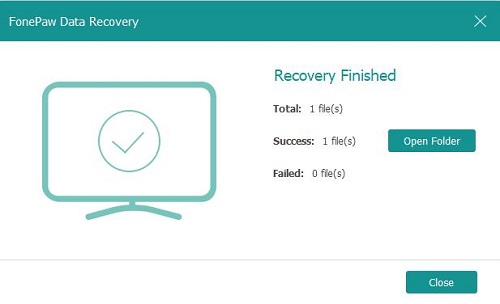
All in all, WD external hard drive not working but blinking means your computer can detect the device. It is just not showing up on your computer. You can choose to access the data with solutions above and use FonePaw Hard Drive Recovery to get your data back.
