FAT32 is the most widely used file system for USB flash drives. You may need to format your USB drive to FAT32 if you want to transfer files between Mac and Windows PC with the USB drive or use the drive for the navigation/audio system in your car. However, you might find there is no FAT32 option to format USB drive on macOS Mojave, High Sierra or earlier version.
If you have trouble in formatting USB to FAT32 on Mac, follow this guide, which will show you 2 ways to format the flash drive to FAT32 on Mac. If you need to recover deleted files after formatting the drive or extracting files from the drive before formatting, you can also use a USB file recovery tool - FonePaw Data Recovery to help you with that.
Option 1: Format USB to FAT32 in Disk Utility
Normally, you can format a USB drive to FAT32 in Disk Utility on Mac. Follow the steps below.
Step 1: Plug the flash drive that you want to format into your Mac computer.
Step 2: Go to Applications > Utilities > Disk Utility.
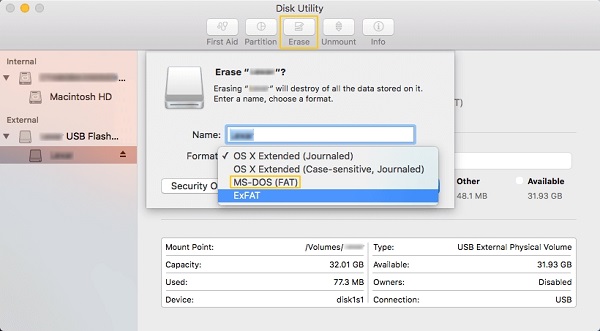
Step 3: Select the connected USB drive and click Erase on the top.
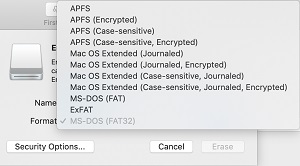
Step 4: In the Erase menu, enter a new name for your USB thumb drive if needed and select MS-DOS(FAT) or MS-DOS(FAT32) for format.
Step 5: Select Master Boot Record and click Erase.
Step 6: When the format process is complete, click Done.

Now your USB drive has been formatted as MS-DOS (FAT32). You can remove it from the Mac computer and use it in Windows PC or your card.
# Why Is FAT32 Greyed out on Mac?
It is very confusing that sometimes you get both MS-DOS FAT and MS-DOS(FAT32) in Disk Utility and in some cases, the MS-DOS (FAT32) option is greyed out. What is the difference between MS-DOS FAT and MS-DOS (FAT32)? And why is the FAT32 option greyed out?

MS-DOS FAT is Mac's name for the FAT file system, including FAT32, FAT16, so when MS-DOS (FAT32) is greyed out, you can just format a USB drive to FAT32 with the MS-DOS FAT option on Mac. The reason why MS-DOS (FAT32) is greyed out on your Mac could be that the option is unavailable for the USB drive you are formatting. For example, Mac doesn't allow you to format 32 GB and smaller SD cards as MS-DOS (FAT32).
Option 2: Format USB to FAT32 with Terminal
If Disk Utility doesn't work for formatting your USB drive, you can also format a flash drive to FAT32 with Terminal.
Step 1: Connect your USB drive and run Terminal on your Mac.
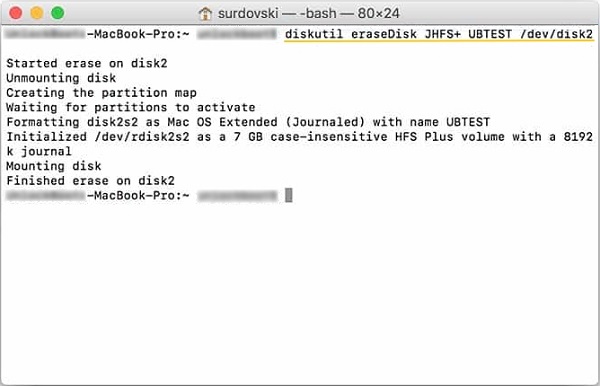
Step 2: Type diskutil list and hit Enter key. All drives on your Mac are listed. Find the location of your USB drive. For example, on this computer, the USB drive is in /dev/disk2.
Step 3: Enter the command: sudo diskutil eraseDisk FAT32 MBRFormat /dev/disk2. (Replace /dev/disk2 with the actual location of the drive on your Mac.
Step 4: Hit the Enter key and your USB drive will be formatted to FAT32.

Recover Files from FAT32 USB Drive After Format on Mac
Formatting a USB drive to FAT32 will erase all data on it. If you are forced to format a flash drive and want to recover your files after formatting, you can do that with the help of FonePaw USB Data Recovery (opens new window). This is a file recovery tool that can restore files from USB drive, SD card, external hard drive, computer drive and more even the drive has been formatted. Photos, documents, videos, audio files are recoverable.
Video Tutorial: FonePaw Data Recovery
Step 1: Download and install FonePaw Data Recovery on your Mac.
Free Download Buy with 20% off Free Download Buy with 20% off
Step 2: Keep your USB drive connected to your Mac and run the application.
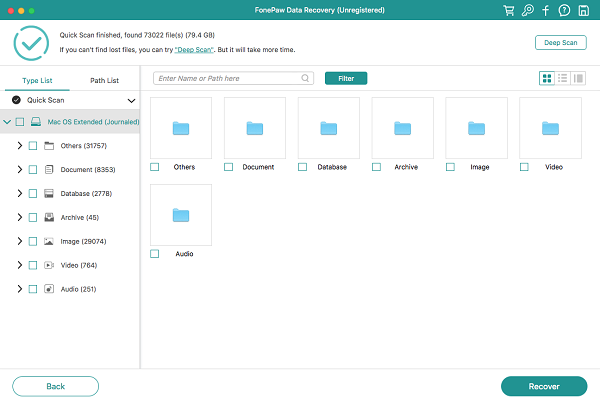
Step 3: Select the kind of files you want to recover and select your USB drive as the location. Click Scan.
Step 4: The program will try to scan out all files on your USB drive.
Step 5: Select the files that you need and click Recover to get them back from the formatted FAT32 flash drive.

If you have more questions about formatting the USB drive on Mac, leave your question below.


