For Mac users, emptying the Trash on your Mac is not only a routine cleanup task but also a critical step in maintaining system health and optimizing its performance. That's because the files you delete on your Mac aren't permanently deleted, but instead reside in the Trash, and as files accumulate in the Trash, they consume valuable disk space and can slow down your Mac.
So how to empty trash on Mac? In this comprehensive guide, we will explore the different ways to empty the trash on your Mac. We'll discuss not only the standard methods but also delve into secure emptying, automation of the process, and even ways to undo empty trash on Mac if you've accidentally deleted something important.

4 Ways to Empty Trash on Mac
Now let's dive into the 4 practical ways to empty Trash on Mac, where all your deleted files and folders are temporarily stored, ensuring that your Mac stays efficient and clutter-free.
1. Right Click the Trash Icon to Empty All Files
The most straightforward method to empty the trash on your Mac is by using the right-click functionality on the Trash icon. This method can quickly and efficiently remove all the files in the Trash at once. Here's how to do it:
Step 1. Right-click the Trash icon in the dock. If you're using a trackpad, you can access the right-click menu by clicking with two fingers.
Step 2. Click "Empty Trash" in the pop-up menu.
Step 3. A window will show up asking if you are sure to permanently delete the items. Click "Empty Trash" in the window to confirm.
![]()
2. Empty Trash in the Trash Folder
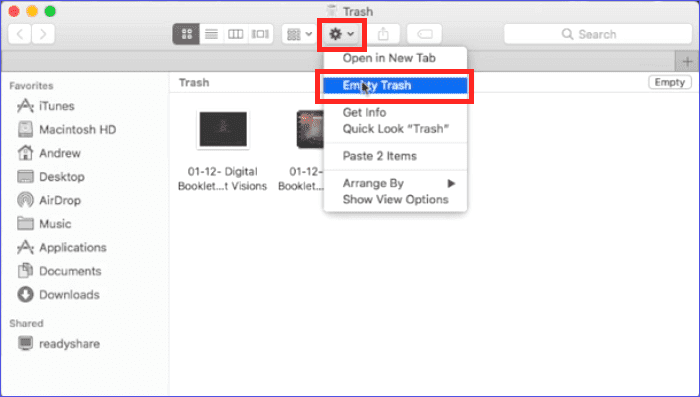
Another method to empty Trash on your Mac is by emptying it directly from the Trash folder in Finder. With this method, you can permanently delete individual items or empty an entire folder at once. This method is especially useful when you want to delete certain files while keeping others selectively. Here's how to do it:
- Open the Trash folder on your Mac. You can access it by clicking the Trash icon in the Finder sidebar, or by double-clicking the Trash icon in the Dock.
- Choose what you want to remove from Trash.
- Delete a Single Item: Hold down the Control key (or right-click) on the item you want to delete and select Delete Now from the menu.
- Empty the Entire Trash: Click the Empty button located in the upper-right corner of the window. Alternatively, you can click the Finder icon in the dock and select Finder > Empty Trash.
- A confirmation dialog will appear, click "Delete" to permanently delete a specific item or "Empty Trash" to empty all files in the Trash.
 Tips:
Tips:If you want to empty the Trash without receiving a confirmation message each time, use the keyboard shortcut Option + Shift + Command + Delete.
3. Automatically Empty Trash on Mac
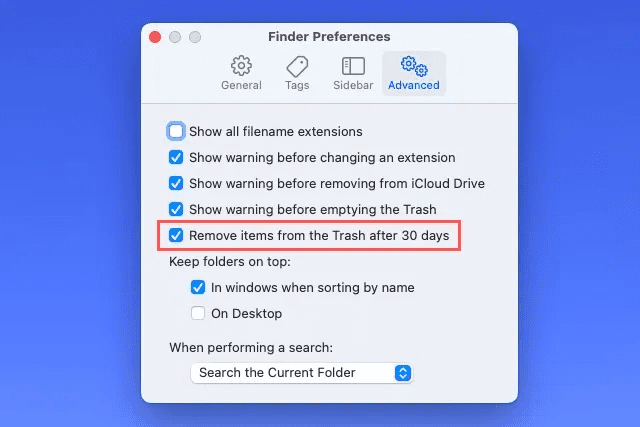
macOS offers a feature that allows you to automatically empty your trash, which is especially helpful for managing your storage space without having to remember to do it manually. Here's how to enable and use this feature:
- Open Finder, then click "Finder" in the top-left menu bar, and choose "Preferences" from the drop-down menu.
- Click the Advanced tab to access advanced settings. <liCheck the "Remove items from the Trash after 30 days" option to activate the Auto Empty feature.
 Note:
Note:It's important to note that when this feature is activated, files won't get a second confirmation until they're deleted after the 30-day period. So make sure you check your Trash regularly and restore any items you may need before they are automatically deleted.
4. Force Empty Trash in the Terminal
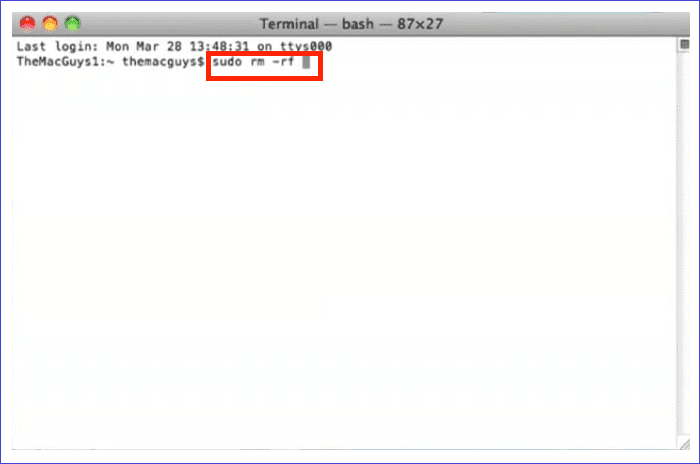
Forcing the Trash to be emptied using Terminal on a Mac is a powerful method used when the regular emptying process doesn't work, usually due to issues such as locked files, permissions issues, or system errors. This method should be used with caution as it bypasses regular protections and may result in files being permanently deleted. The following shows how to do this:
- Open the Terminal application. You can find it under Applications > Utilities, or you can use Spotlight (Command + Space) to search for "Terminal".
- Type "sudo rm -R" and add a space after "R" in the Terminal. Do not press "Return" after that.
- Open the Trash and drag and drop the items you want to delete into the Terminal window. This will add their paths to the command.
- Press "Return". You’ll be prompted to type your administrator password.
- Press "Return" again. The Terminal will force empty the Trash, removing the files you specified.
How to Undo Empty Trash on Mac
Once you've emptied the Trash on your Mac, macOS doesn't offer a native feature to undo this action, as it usually prompts for confirmation before permanently deleting files. However, if you've accidentally emptied the Trash, there's still hope for recovery, such as using third-party data recovery tools to recover deleted files. FonePaw Mac Data Recovery is one such software.
FonePaw Mac Data Recovery is an all-in-one solution for various data loss scenarios on Mac computers, including emptied Trash. The software is perfect for urgent recovery situations, requiring no prior backups and offering a high recovery rate for a wide range of file types and devices.
FonePaw utilizes a simple and intuitive interface that eliminates the complexity of command line recovery, and the recovery process can be done in person at home to ensure privacy. With flexible scanning options and a preview feature, FonePaw provides a user-friendly and efficient recovery experience.
Free Download Buy with 20% off Free Download Buy with 20% off
To undo empty trash using FonePaw Mac Data Recovery, follow these simple steps:
Step 1. Download and Install FonePaw
Download FonePaw Mac Data Recovery from its official website and install it on your Mac. It offers a free trail for user to preview scan results before purchasing the full version, enhancing user experience.
Step 2. Start Scanning Process
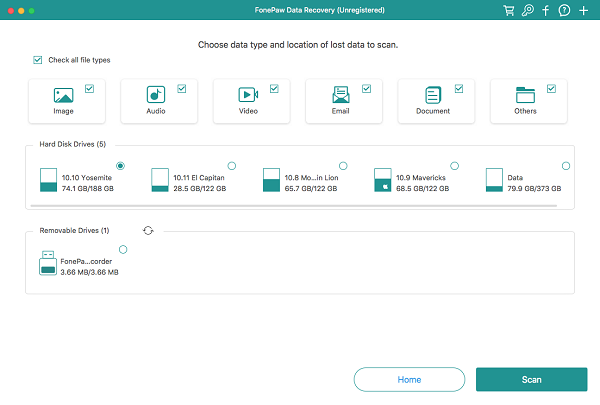
Launch FonePaw, select the types of files you want to recover (photos, documents, emails, etc.) and the drive where your Trash is located, and then click "Scan" to begin the scanning process.
Step 3. Choose the Deleted Files to Recover
After scanning, FonePaw will display a list of recoverable files. Preview these files, select the ones you need to recover, and click the "Recover" button.
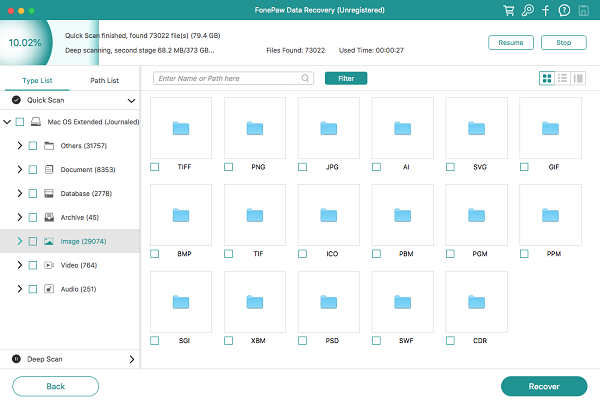
Step 4. Finish Mac Trash Recovery
Once the recovery process is complete, verify the recovered files in the destination folder you chose.
FAQs about Emptying Trash on Mac
How to secure empty trash on Mac?
To securely empty Trash on a Mac with a spinning hard drive, especially for macOS versions 10.10 or earlier, you can use the Secure Empty Trash feature by the following steps:
- Drag the files or folders you want to delete to the Trash in the Dock.
- Click the Trash icon to review the contents you're about to delete.
- In the Finder menu, choose "Secure Empty Trash".
- A warning message appears. Click "OK" to proceed with secure deletion.
- The process is complete when the progress bar disappears, and the files are securely erased and unrecoverable.
For the most recent Macs equipped with SSDs or running macOS 10.11 and later, every time you empty trash means secure emptying trash by default. This is due to the SSDs guaranteeing that deleted files on your Mac are automatically and securely erased.
Is there a faster way to empty trash on Mac?
The fastest way to empty Trash on Mac is to right-click the Trash icon in the Dock and choose "Empty Trash". This method is a quick and straightforward way to clear the Recycle Bin of all files.
However, always use this method with caution. Once the Trash is emptied, the files are permanently deleted and cannot be easily recovered. Therefore, before using this method, it is recommended to open the Trash folder and take some time to review the contents to make sure there are no important files that may be deleted by mistake.
Final Words
In conclusion, we have explored 4 methods of how to empty Tash on Mac, each catering to different needs and preferences, from straightforward right-clicking methods to advanced options like using Terminal for stubborn files.
Keep in mind that while emptying the trash is certainly about keeping your Mac clean and efficient, it's also important to be careful to ensure that important data isn't accidentally deleted through negligence. If it does happen that you have accidentally erased useful data, you can restore your important files by using our recommended tool FonePaw Mac Data Recovery.
