If you want to capture clearly what's happening on your screen, whether you are trying to send a walkthrough to a family member on how to set up their new iPhone, or perhaps you want to share a gossipy video you've seen online, or you may want to record WhatsApp calls, iPhone's built-in Screen Recording tool can help you create a video of the on-screen activity. The process is easier than you might think. Just follow the guide below to screen record on your iPhone!
How to Screen Record on Your iPhone
Since Apple released iOS 11, the iPhone has had a built-in screen recording tool. Once you've added it to the Control Center, starting a recording is easy. If you don‘t know how to enable the screen recording tool on your iPhone, you can scroll down to the FAQ part.
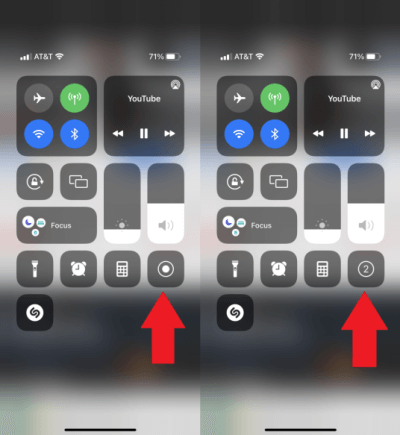
Step 1. Open Control Center
Swipe down from the top right corner of your iPhone with iPhone X or later. If your iPhone doesn't have a Face ID (iPhone 8 or earlier; iPhone SE), just swipe it up from the bottom of your iPhone.
Step 2. Tap the Recording Button
When you tap it, the on-screen recorder button will show you a countdown (3 seconds). After that, the on-screen recording button will turn RED immediately, then you can screen record whatever you want during this time.
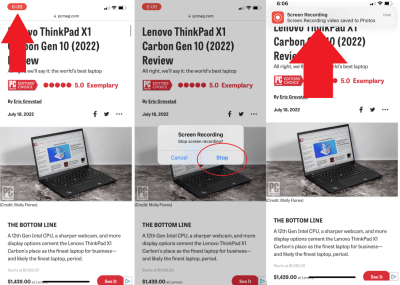
Step 3. Finish the Recording
When you are done, you can the Control Center again to tap the stop button or tap the red clock on the top-left of the screen. Select “Stop” to end the recording and you will be notified that it was saved in the Photos app.
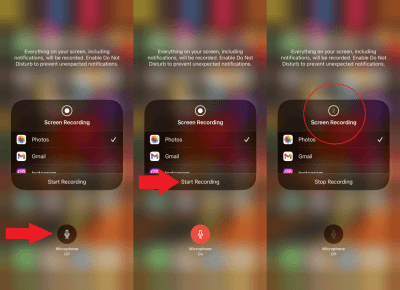
Tips: How to Screen Record with a Microphone on iPhone?
If you want to make a screen recording with your voice, you only have to add one more step. When you open Control Center, long-press the Screen Recording button and you will see an additional menu. Then turn the microphone on, and tap Start Recording. When you finish, you can reopen Control Center and tap to stop, or tap the red clock at the top left of the screen.
How to Edit Screen Recordings on iPhone
When you finish recording, your on-screen recorded video will be saved in the Photos app. With the Photos app, you can change the start or stop times, add filters, and rotate your recordings to make them vivid. There are 4 main functions as follows:
Trim Your Video
Open the Photos app and look for your on-screen recording. Then move the slider across the video timeline to change the length. Tap done, then tap save video or save it as a new clip.
Customize Your Video
After confirming the trimming of your on-screen recording, you can modify the exposure; highlights, shadows; etc. If you want a more convenient way, tap AUTO, which will automatically set the recording for you.
Beautify Your Video
The current Photos app offers 9 filters for you. You can change the style of your on-screen recordings. If you don't need that, keep it as it is.
Adjust Your Video
You can rotate, flip, and adjust the look of your on-screen recording to the frame scale, or leave it as original if you do not want to change it.
 Tip:
Tip:
- The latest version of the system, iOS 16, enhances the Photos app with new one-stop features. You can copy the edit from one video and paste it into another. That's really awesome!
FAQs about Screen Recording on iPhone
How to Turn on the Screen Recording Feature on My iPhone?
In general, the Screen Recording button is placed in the Control Center. If it doesn't include, you can open the Settings, tap the Control Center and add the Screen Recording from the "More Controls". You can also rearrange the order if you want.
How to Prevent Unexpected Notifications while Screen Recording on iPhone?
You can set Do Not Disturb temporarily. First, open the Settings and click "Focus" then select the first one Do Not Disturb. After that, you are free to make a screen recording. You can also find Focus in the Control Center, long-press it, and select Do Not Disturb.
iPhone Storage is Full and Can't Record Videos from Screen. How to Fix?
First and foremost, you can remove unused phone data such as apps; duplicate photos or media, which is the most straightforward way to free up storage space. What if you still want to keep them all? Then try using the versatile screen recording app - FonePaw Screen Recorder. FonePaw Screen Recorder is a one-stop screen recording tool with over 20 recording features. It doesn't take any storage from your iPhone by creating a screen mirror on your computer and storing the record on your drive.
Here is the simple user guide to record your Screen with FonePaw Screen Recorder
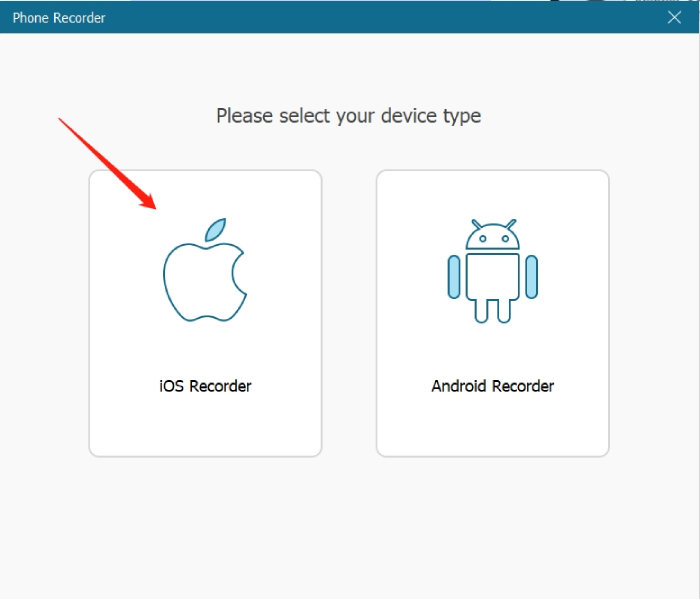
Step 1. Open the app and choose iOS Recorder
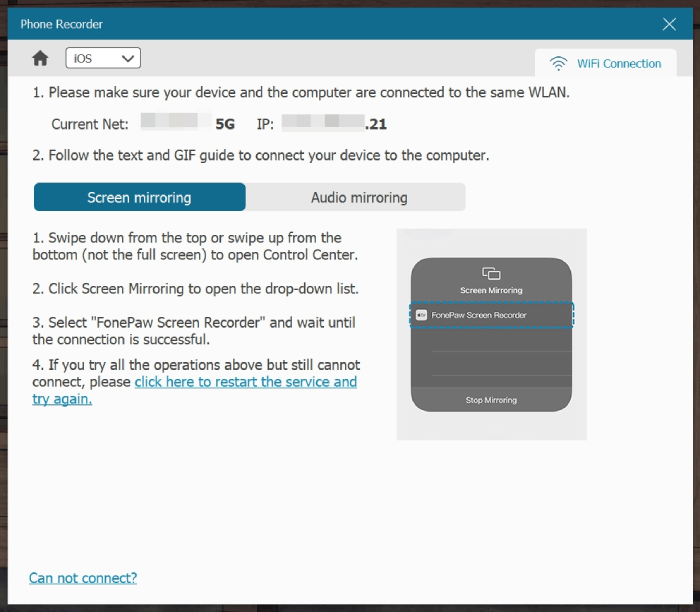
Step 2. Make a Screen Mirroring to Your Computer
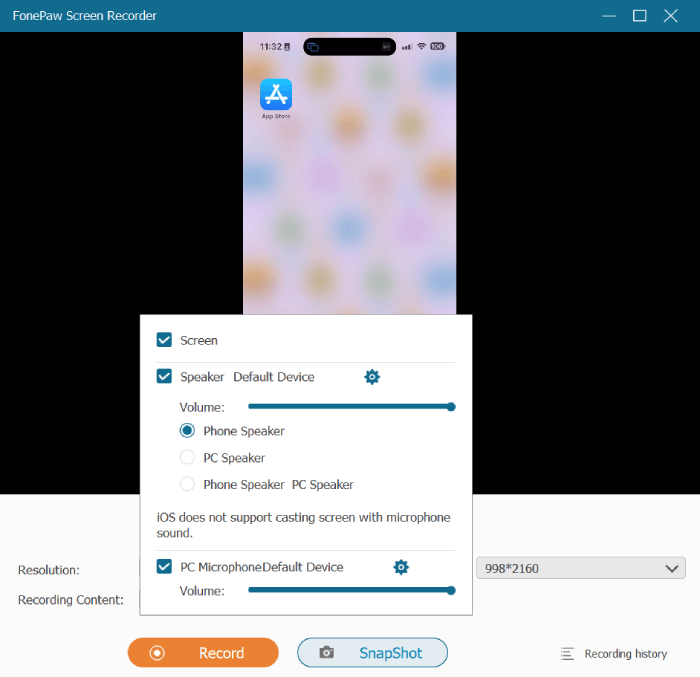
Step 3. Customize the Advanced Settings
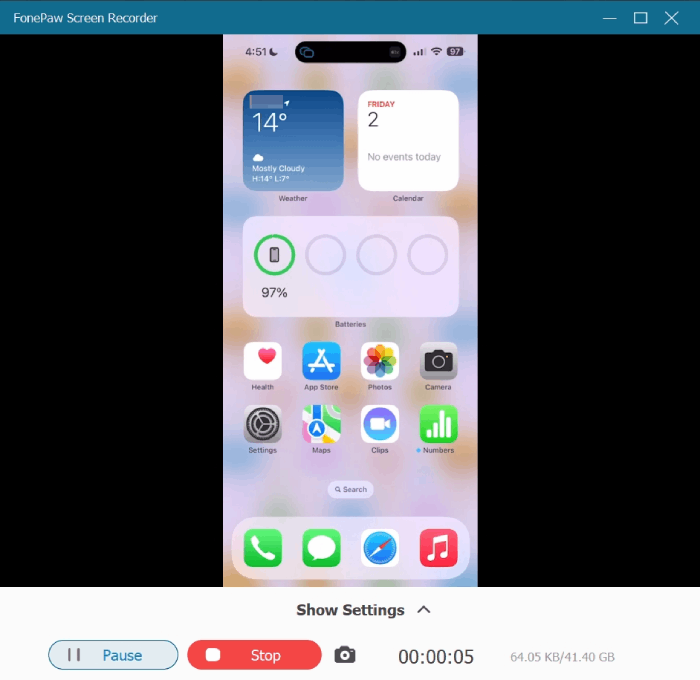
Step 4. Start to Record and Save it to your Computer
Conclusion
In this article, we shared how to make a screen record and edit it on your iPhone. In addition, we also recommend an excellent third-party recorder, FonePaw Screen Recorder, to you in case your iPhone is out of storage. With powerful and professional recording features, the possibility of screen recording on iPhone is endless. Let's give it a try!
