When more and more things have to be done online, there must be the times when you would need to record audio on PowerPoint, like when you need to do a presentation online with the PowerPoint, or you have to give lessons to students through the PowerPoints with audio recorded together. As a result, if you also need to add audio on PowerPoint to make your document easier for others to understand, just keep reading now. Today's article will show you the ways to record audio on PowerPoint on both Windows/Mac easily. Have a look.
How to Record Audio on PowerPoint on Windows
For Windows users, the "Slide Show" recording feature provided in Microsoft PowerPoint can directly meet your needs in recording audio on PowerPoint. You won't need to install other software but simply process the recording within your PowerPoint. Now, just prepare your PPT and follow the steps below to try recording audio on it.
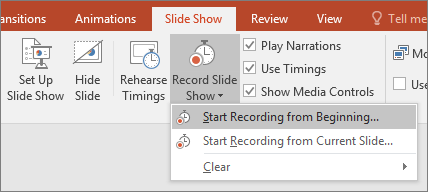
Step 1. Open your PowerPoint in Microsoft PowerPoint then select the "Slide Show" option from the menu bar. Here, you can find the "Record Slide Show" option. Click the down arrow icon and choose "Start Recording from Beginning…".
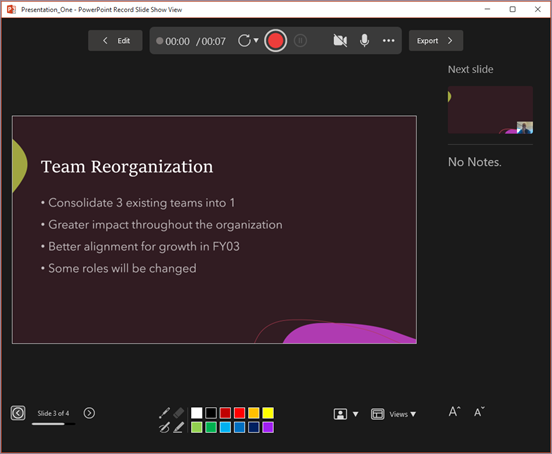
Step 2. Now the recording mode will be turned on. In the bottom-right corner, you can also turn on microphone and webcam for recording with PowerPoint together by clicking the first or the second icon. The third icon will be available when you select the video recording, and this option is the video preview function.
Step 3. By going to the top-right corner, you can click "Settings" to choose the microphone or camera you want to record with PowerPoint.
Step 4. Then by pressing the record icon in the top-left recording bar, the PowerPoint will begin to be recorded. Now you can control the PowerPoint slides and talk through the microphone to let it record audio on PowerPoint. But pay attention not to speak while transiting the slide, because the audio during the transition will not be captured.
Step 5. During the recording, you can:
- Draw on PowerPoint using the editing bar provided at the bottom. The added texts will be saved with the recording.
- You can check how many slides are left by seeing the numbers in the bottom-left corner.
- Clicking the "Clear" button on the top-right cornet next to "Settings", you can clear recordings on all slides of some of them.
- When you have deleted the recording of one slide and want to re-record. Just go back to it and click the record icon to start recording again.
Step 6. When the recording is finished, close the recording mode and go to save the recorded PowerPoint with audio:
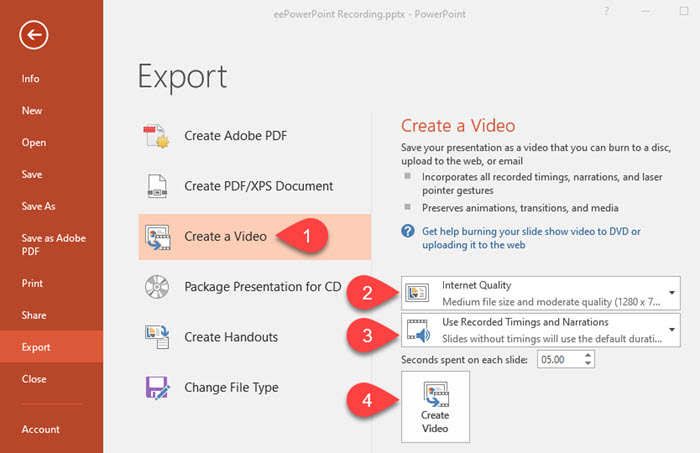
- Just click "File" on the menu bar and choose "Export" and select "Create a video".
- Choose the quality you like to save the recorded PowerPoint with audio. You can select the best "Full HD 1080p" option.
- Finally, click "Create Video" and choose a place to save it. By pressing "Save" and you will get it.
How to Record Audio on PowerPoint on Mac
On Mac, people can also use the in-built "Record Slide Show" function to record audio on PowerPoint just like Windows users do. Let's also see how to do it on Mac following the steps provided here.
Step 1. Open the PowerPoint you need to record audio on Mac computer. Then also go to "Slide Show" and select the "Record Slide Show" option.
Step 2. When you are in recording mode now, firstly you will also need to turn on your microphone (or camera) by clicking the icons provided in the bottom-right corner. Also, choose the one microphone or camera you want to record audio and video from in the top-right "Settings" menu.
Step 3. Now, click the record icon to start recording audio on PowerPoint on Mac. You can flexibly control the slides, add notes, stop or pause the recording, or even clear the recordings of some slides like doing on Windows.
Step 4. When the recording finishes, exit the recording mode and click "File" then "Export…" to begin save the recorded PowerPoint now. You can select the "File Format" and "Quality" for it freely as you want. Just make sure the "Use Recorded Timings and Narrations" option is selected.
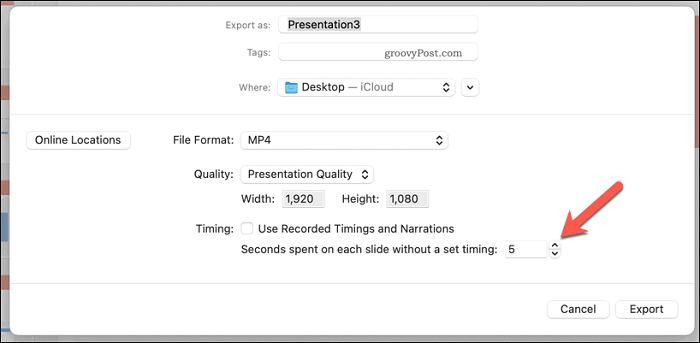
Step 5. Finally, click "Export" and the recorded PowerPoint with audio will be saved on your Mac immediately.
How to Record a PowerPoint Presentation with Screen Recorder
Except for using the in-built "Slide Show" recording function provided by the official Microsoft PowerPoint, some people may need a professional recorder to record audio on PowerPoint, because the official recording function would lack some features that people would need. To record audio on PowerPoint more professionally, FonePaw Screen Recorder can be your good choice.
Free Download Buy with 20% off Free Download Buy with 20% off
FonePaw Screen Recorder provides simple but professional screen recording functions for people to easily capture audio on PowerPoint even with the system sound, microphone, and webcam turned on. With the annotations adding, hotkeys controlling, high-quality outputs, and more advanced recording features, people can process the PowerPoint audio recording in a very simple way with the help of FonePaw Screen Recorder, and save them in higher quality with different common formats.
Also, as PowerPoint can't record the audio during the transition between two slides, FonePaw Screen Recorder can make up this disadvantage and record the smooth PowerPoint audio for you.
Key Features:
- Provides several recording modes to select recording the computer screen
- Allows to customize the recording settings and turn on system sound, microphone, webcam to record at the same time
- Provides adjustable output options to save recordings in the quality you need
- Offers hotkeys to control the recording in more flexible and convenient ways
- Provides editing toolbar to add notes on recordings directly
- Supports more helpful recording features such as scheduled recording, locked window recording, and so on to record the screen easily
Record Audio on PowerPoint with FonePaw Screen Recorder
Free Download Buy with 20% off Free Download Buy with 20% off
Step 1. Install FonePaw Screen Recorder and Open Video Recorder
To get started, you need to install FonePaw Screen Recorder on your computer and then open it. Choose the "Video Recorder" from the home screen and then you can begin to set the recording settings before starting to record your PowerPoint.

Step 2. Do Video Recording Settings
In "Video Recorder", you can turn on the "System Sound", "Webcam", and "Microphone" to record all of them at the same time. FonePaw Screen Recorder also allows you to change the recording area flexibly based on your needs.

Then by going to "Preferences", you can do more settings such as choosing the parameters in "Output", turn on the mouse effect, or change the hotkey settings based on your needs to make the recording to have higher quality and do it in a more convenient way.

Step 3. Start Recording Audio on PowerPoint
After the settings, you just need to click the "REC" button to start letting FonePaw Screen Recorder record the PowerPoint with audio. You can use the provided editing toolbar to draw and take notes on the recording when you need.
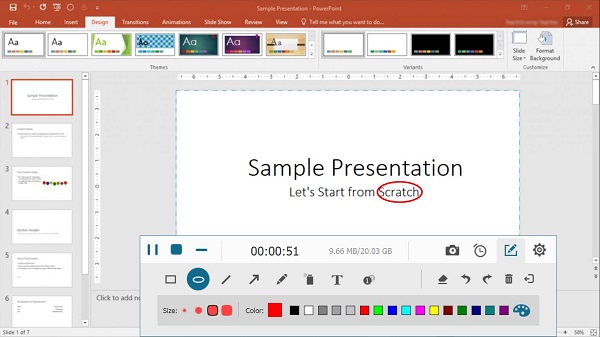
Step 4. Stop the Recording and Save It
Finally, when your PowerPoint presentation is ended, just click the "Stop" icon and you can preview the recording condition of the video. By clicking "Save" and the recorded PowerPoint with audio will be directly saved to your computer offline.

Conclusion
When you have the needs in recording audio on PowerPoint, except for using the default "Record Slide Show" function provided in Microsoft PowerPoint, you can also consider selecting FonePaw Screen Recorder to help. The software can fix some disadvantages you of PowerPoint's in-built recording function and record your PowerPoint with better quality. You can install it and freely try immediately!
