Google verification is called Factory Reset Protection (FRP) in Android. Generally, Android users wouldn't notice that their phones are protected by Factory Reset Protection until they need to verify Google account to access their phones. Now follow this tutorial to get a better understanding of FRP, including: how it works, how to enable or disable FRP, moreover, how to bypass Google account verification (FRP) on Samsung, LG, Alcatel, ZTE and more if you forget the Google account and password on your phone.
People Also Read:
How to Factory Reset An Android Phone (opens new window)
Forgot Android Passcode/Pin, How to Unlock? (opens new window)
Part 1: How Does Google Verification (Factory Reset Protection) Work?
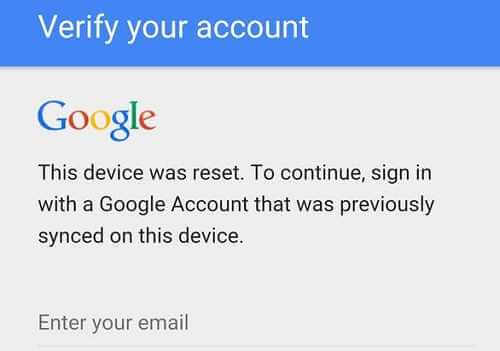
Factory Reset Protection (FRP), also known as Google account verification, is a feature added to Android device since Android Lollipop. Most stock Android models are equipped with this feature. Once you enable FRP on your phone, when you or others try to set up the phone after factory reset in recovery mode, the phone will require you to verify your account. You must enter Google username and password to access the phone. You could see the following page.
Tip: Resetting your Android phone to factory settings will wipe out all data in your phone, so you may want to back up important files to computer (opens new window) before resetting. Android Data Backup & Restore can help you with that.
FRP is designed to make sure that no one can easily wipe out the data and factory reset your phone if the phone is lost or stolen. It is a good thing, which make our Android device less tempting to the thieves. However, FRP could also be a headache sometimes. For example, when we totally forget the FRP and send the phone to the next user(a friend or a ramdom guy that buys the phone), we may end up having to share our Google account temporarily with others. Luckily, it is very easy to disable FRP on Android device.
Part 2: How to Enable and Disable Factory Reset Protection
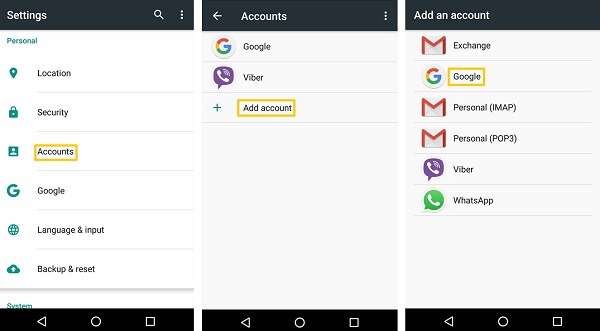
FRP is automatically enabled once you have added a Google account to your phone. To add a Google account:
- Go to "Settings" > "Accounts" > "Add and account" > "Google". Then enter the username and password of your account to add the account.
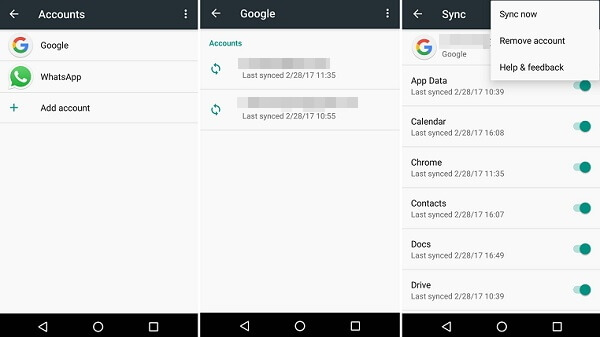
To disable FRP, you just have to remove Google account from your phone.
- On your Android phone, go to "Settings" > "Accounts" > "Google", choose the google account that you have added and find "Remove account" by clicking the icon on the top right corner.
To conclude, before you send your phone to the next user, you should first remove Google accountfrom your phone to disable FRP, then you wipe out all data in your phone. In this way, the next user can set up the phone without stopping by FRP.
Tip: to avoid the trouble of FRP, you should not factory reset your phone in 24 hours after you have recently changed the Google password associated to your phone. Due to security reason, Android wouldn't allow you to set up your phone with a Google password that is newly reset within 24 hours.
Part 3: How to Bypass Google Account Verification on Samsung, LG, and More(No APK)
If you forget the password after factory reset, how to bypass Goolge verification without Google account?Some hackers have figured out ways to bypass FRP without computer, APK or OTG. Here are two simple tricks that might work for you. You can bypass Google verification on Samsung, LG, Alcatel, Nexus and more.
IMPORTANT NOTE: As Google keeps patching security holes in Android with new updates, the methods might not work on newer Android versions. And since Android is customized by manufacturers on different phone(Samsung, HTC, LG, etc.), the FRP bypass methods don't work on all Android phones.
Method 1: Bypass Google Account via OEM Unlocking
Step 1 When you see the FRP page that requires you to enter the Google account previously synced to the phone, long press the @ on the keyboard until a window pops up.
Step 2 Tap "Google Keyboard Settings" on the pop-up window.
Step 3 Click on the three dot on the upper right and choose "Help & Feedback" item. Select a ramdom item and long press to copy some of the text. You will see a web search icon on the upper right. Click the icon and on the search field appearing, type "Settings".
Step 4 You'll then enter the "Settings" app of the phone. Go to "Developer Options" (if the option is not in the list, tap on "Build Number" 7 times to pull out "Developer Options" ) and allow "OEM Unlocking".
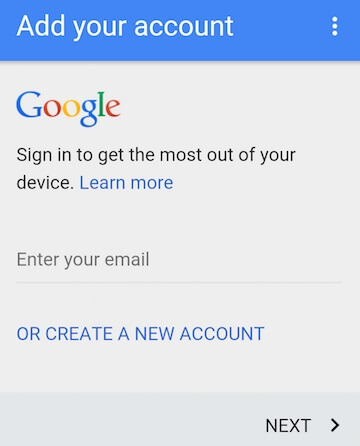
Step 5 Long press the "Power" button to reboot the phone. When setting up the phone, inteads of the FRP page, you'll see "Add your account" page. Add a Google account and you can enter the device now.
Method 2: Bypass Google Verification via Reset
Step 1 On Verifying your account page, return to Select Wlan Network page and add a new network.
Step 2 Type a line of random characters on Network SSID. Long press the characters and choose Share.
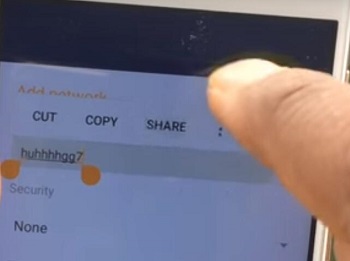
Step 3 On the pop-up page, long press Gmail and it will shows Gmail's App info. Choose Notification > App Settings.
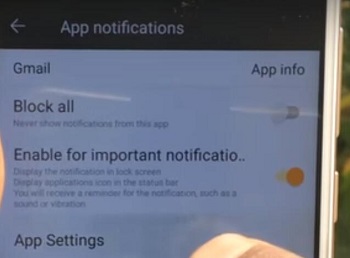
Step 4 Tap three dots icon and choose Manage Account. You will see the below notification. Tap Continue to enter Settings.
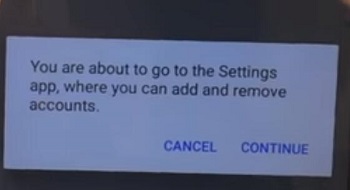
Step 5 On Settings, choose Backup & Reset > Factory data reset. After the reset, Google account will be removed from the phone.
Part 4: FRP Bypass APK to Bypass Google Account Lock
If the method doesn't work for you, you may use FRP bypass APK to remove Google account verification. There are many tools developed to bypass Google account on Samsung, LG, Nexus, Huawei, Alcatel and more. Basically, most FRP bypass apps help you to remove Google account lock in the following steps.
Step 1 Choose a suitable FRP bypass app, such as FRP Bypass APK, Pangu FRP Bypass APK. Some of them are not free to use.
Step 2 Download the bypass tool on a USB drive.
Step 3 Connect the USB drive to the phone via OTG cable. Then install the APK. After installing the FRP bypass app, you can get access to phone settings and erase everything, including Google account on the phone.
Tip: If you don't have a OTG cable, you can also use a FRP bypass tool with computer.
If you have more question, leave a comment below.


