When it comes to transferring photos from PC to iPhone, the disparity between Windows and iOS system seem to pose a challenge. In fact, however, you can easily make this happen - whether you want to move photos from Windows 10/11 computer to iPhone or vice versa - as long as you have reliable transfer methods. In this case, this post will walk you through several viable ways to remove the barrier between Windows and iOS. Now, let's scroll down and dive in!
 Update:
- This article covers methods to transfer photos from PC to iPhone, compatible with the latest iPhone 16 and iOS 18 updates.
How to Transfer Photos from PC to iPhone Without iTunes
Transferring photos from a Windows computer to your iPhone is a recurring problem for many users. While iTunes was once the go-to solution, it's operational complexity and occasional data loss, coupled with limitations such as lack of support for certain formats and slow transfer speeds, have driven users to seek more streamlined alternatives.
In order to help users avoid the possible problems caused by iTunes, we hereby recommend you 2 simple ways to transfer photos from PC to iPhone without iTunes.
Method 1. FonePaw DoTrans
As we said above, traditional methods such as iTunes are fraught with complexity and the potential risk of data loss. That's why iOS transfer software comes in, offering the best way to transfer photos from PC to iPhone
Among all the dedicated iOS transfer software, FonePaw DoTrans stands out prominently. It is a versatile and user-friendly iOS transfer software that offers wired and wireless connectivity with unprecedented flexibility. It allows you to transfer photos in batches at high speeds and provides the marvelous ability to preview selected images, making photo transfer more targeted. Moreover, it is more than a photo transfer tool used on iOS and Windows. It can also be employed on Android. And various files this top-rated tool can transfer as well, be it video, contracts, or messages.
- Cross-System Transfer - It streamlines the process of transferring data between various devices, primarily focusing on Windows PC, iOS, and Android devices.
- Versatile Media Management - Users can easily import, export, or delete various types of media files, including photos, videos, music, contacts, messages, and more.
- Backup and Restore - It offers a reliable backup and restore feature, allowing users to create backups of their iOS devices and restore them whenever needed.
- Fast Transfer Speeds - It boasts impressive transfer speeds, ensuring your files reach their destination in a fraction of the time.
- Built-in Toolbox - With an array of user-friendly tools seamlessly integrated within the software, it allows users to manage their data with a diverse range of functions.
In essence, all the intuitive design and feature-rich capabilities make FonePaw DoTrans a valuable tool for anyone seeking a reliable and efficient way to transfer photos from PC to iPhone. Here's a step-by-step guide on how to achieve this:
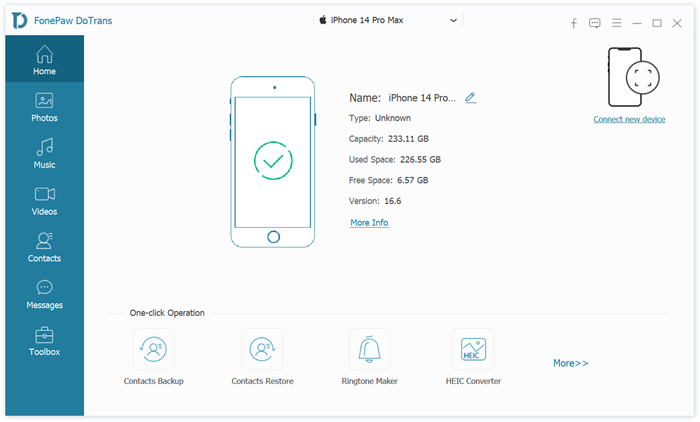
Step 1. Launch FonePaw DoTrans and Connect iPhone to PC
Install and Launch FonePaw DoTrans on your computer and then connect your iPhone 16/15/14/13/12/11 to your PC using a USB cable. FonePaw DoTrans will promptly detect your device.
Step 2. Choose Photos You Want to Transfer
Go to the "Photos" section, browse through your PC's photo collection, and then simply click the "+" icon to choose the photos you want to import from a Windows computer to your iPhone.
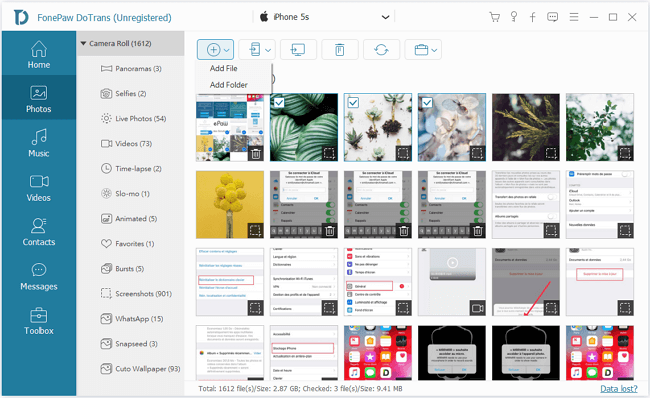
Step 3. Transfer Photos from PC to iPhone successfully
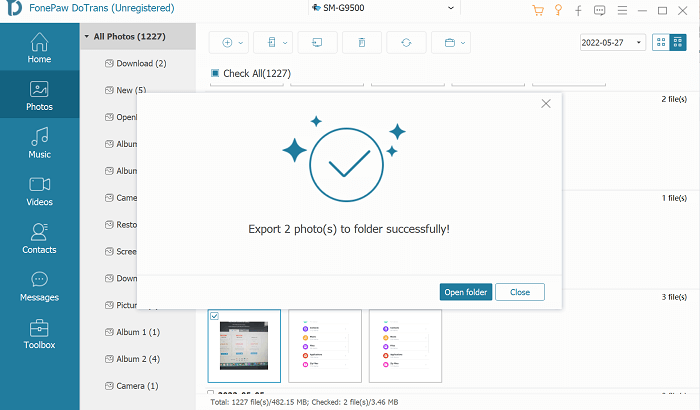
Once done selection, you can choose your iPhone as the destination from the "phone" icon. Then batch photo transmission will be completed quickly in a short period of time. After that, you can check the photos app on your iPhone.
Now let's follow the video tutorial and learn how to transfer photos using DoTrans and other methods!
Method 2. File Explorer
Another convenient way to move photos from PC to iPhone is to use File Explorer, the built-in file management tool in Windows. With it, users can seamlessly navigate their computer's file system, organizing, copying, moving, renaming, and deleting files and folders with ease. It is available for several Windows operating systems, starting with Windows 95 and continuing with versions such as Windows 10. And here are the simple steps to transfer photos from PC to iPhone using File Explorer:
Step 1. Connect your phone to the computer using a USB cable, and click the "Trust this computer" option to unlock your phone.
Step 2. Open File Explorer, select "Apple iPhone", and then access the "DCIM" folder under "Photos."
Step 3. Copy the folder of photos you want to transfer and paste it onto the iPhone icon so you can access the photos on your iPhone.

How to Transfer Photos from PC to iPhone Wirelessly
While the methods that move photos from Windows PC to iPhone with USB are above, there are also some ways to transfer photos from computer to iPhone without itunes wirelessly. In this part, two approaches that can help you wirelessly export pictures have been displayed. Now keep reading and getting more.
Method 3. Bluetooth
One convenient method of wireless transmission is through a Bluetooth connection. Just ensure your computer is Bluetooth-enabled, then proceed to pair your iPhone to begin transferring. Here is how:
Step 1. Enable Bluetooth on your computer and iPhone respectively.

- For PC: "Devices" > "Bluetooth & other devices" >Toggle on the Bluetooth switch.
- For iPhone: "Settings" > "Bluetooth" > turn on Bluetooth.
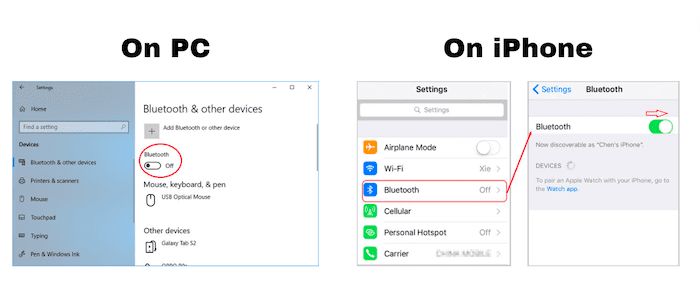
Step 2. Pair your PC with your iPhone by choosing your iPhone from the Bluetooth device list.
Step 3. Once connected, you can select the photos you want to transfer and send them from PC to phone via Bluetooth.
Method 4. OneDrive
OneDrive can be a useful alternative to wirelessly transfer photos from PC to iPhone. It is a cloud storage service provided by Microsoft that allows users to store and synchronize files and data across various devices. It enables users to save files, photos, videos, and documents in a secure online storage space, making them accessible from anywhere with an internet connection. To move photos from PC to iPhone using OneDrive, you can refer to the steps below.
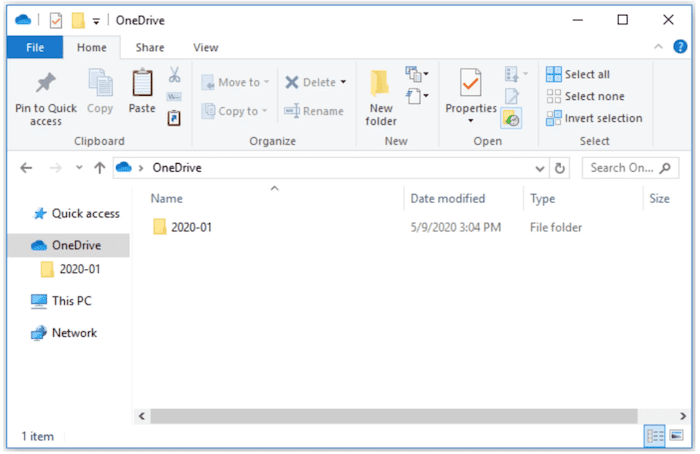
Step 1. Set up OneDrive on your PC and sign in.
Step 2. Copy the desired photos to the OneDrive folder on your PC.
Step 3. Install the OneDrive app on your iPhone and sign in with the same account. After the syncing process, you can access the transferred photos from your PC.
Extension: Transfer Photos from PC to iPhone with iTunes
The earlier methods have highlighted how to transfer photos from Windows PC to iPhone without iTunes. But if you are familiar with iTunes' operations and can appropriately configure its transfer options, you can effectively achieve photo transfer. And here are the step-by-step instructions to transfer photos from PC to iPhone with iTunes.
Step 1. Gather the pictures you want to transfer and create a folder for them.
Step 2. Download and launch iTunes on your PC if you don't have one, and then connect your iPhone to your PC using a USB cable. Tap "Trust" on your iPhone and input your lock screen password for data access.
Step 3. Once your iPhone is detected, click the "iPhone" icon on the top bar of iTunes. Then go to the "Photos" option.
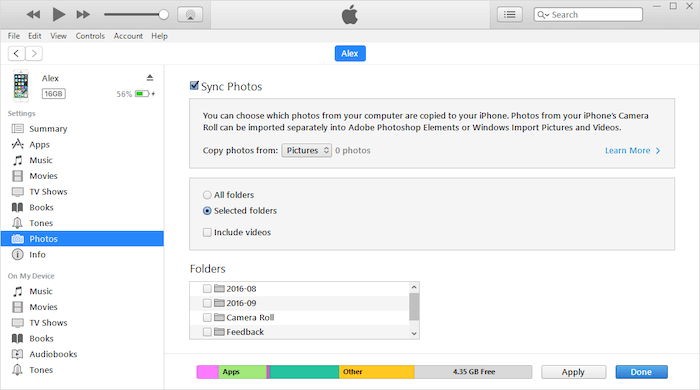
Step 4. Enable "Sync Photos" and click on "Copy photos from:". Then select the folder you create and click "Sync" at the bottom of the screen. Wait for several minutes, you can check the transferred photos on your iPhone.
Conclusion
To sum up, we've delved into four distinct approaches to transferring photos from PC to iPhone: FonePaw DoTrans, File Explorer, Bluetooth, and OneDrive. While File Explorer and Bluetooth provide viable options, they might encounter compatibility or speed constraints. OneDrive, though wireless, depends on internet stability and storage limitations.
In contrast, FonePaw DoTrans stands out among the alternatives, offering multi-platform compatibility, high-speed transfers, extensive file formats, etc. to ensure a seamless and efficient photo transfer experience. For more efficient and hassle-free photo transfer, get started with FonePaw DoTrans now!


