Music is the spice of life. If you have some favorite songs on your Windows/Mac computer, you may wonder how to transfer music from computer to iPhone, so that you can enjoy tunes on the go without the internet. Where there is a will, there is a way. Better yet, they are 4 ways to transfer music from PC to iPhone with or without iTunes. Now, check out the overview below and pick a preferred way to get started.
 September 2024 Update:
- This article covers iPhone music transfer methods compatible with the latest iPhone 16 and iOS 18 updates.
Part 1. Transfer Music from PC to iPhone via iOS Transfer
FonePaw iOS Transfer is a professional transfer program with a great reputation. This optimal transfer enables you to add songs from a computer to iPhone, as many as you want and as fast as a flash. It supports almost all audio formats like MP3, AAC, MP2, WAV, WMA, M4A, M4V, OGG, FLAC, etc. Then, you can listen to your favorite songs on your iPhone 16/15/14/13/12/11 wherever you go. Just put on your earphones and dive into the music world.
- Support All Types of Files - Transfer music, videos, photos, contacts, messages, etc.
- Retain Original Quality - Transfer MP3 from computer to iPhone without quality loss.
- Easy Management - Take no effort to manage files on iPhone more easily than iTunes.
- Full Compatibility - Transfer between Windows, Mac, and iPhone
- Excellent Performance - Ensure a fast, safe, stable, and lossless data transfer.
- More Tools - One-Click Backup & Restore Contacts, Ringtone Maker, HEIC Converter.
STEP 1. Launch FonePaw iOS Transfer
First off, click the button below to download and install FonePaw iOS Transfer on Windows PC. Then, launch it.
STEP 2. Connect iPhone to Computer
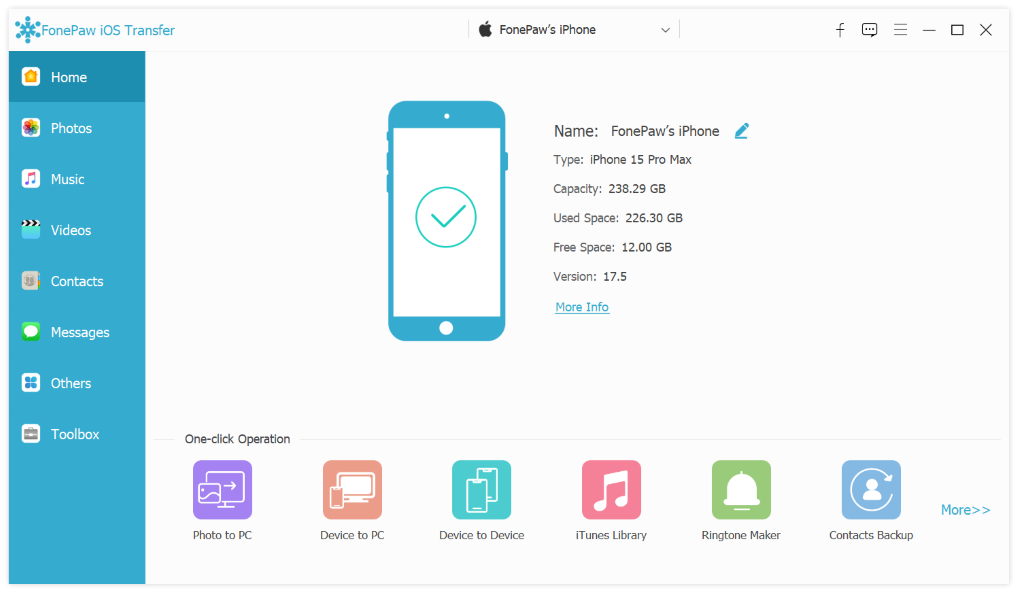
Use a USB cable to hook up your iPhone to the computer. When detected, the information will show on the interface.
STEP 3. Put Music on iPhone from Computer
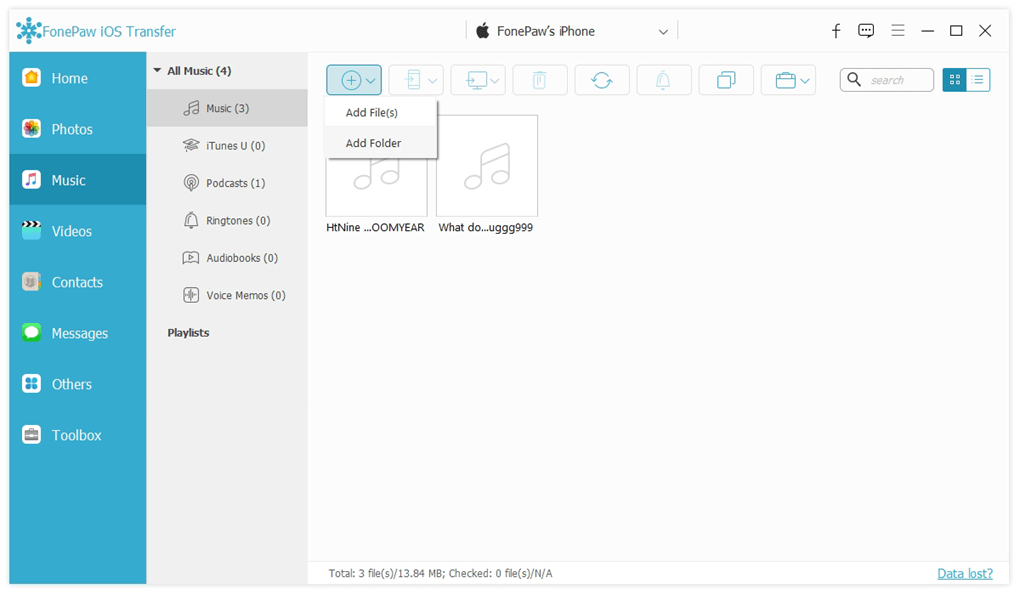
Switch to the "Music" tab on the left and click the "+" icon > "Add Files(s)" or "Add Folder". Now, select as many songs as you want on your computer and add music from computer to iPhone.
Part 2. Transfer Music from PC to iPhone with iTunes
Through iTunes, you can directly sync all music from the computer to your iPhone. Please note that you should create a playlist in the iTunes library if you just want to transfer selected songs. Meanwhile, don't transfer too many songs at a time, or iTunes will break down. Here's how to transfer iTunes music to iPhone with iTunes for free.
STEP 1. Open the latest iTunes on Windows or Finder on macOS 10.15 and above.
STEP 2. Connect your iPhone to the computer using a USB cable.
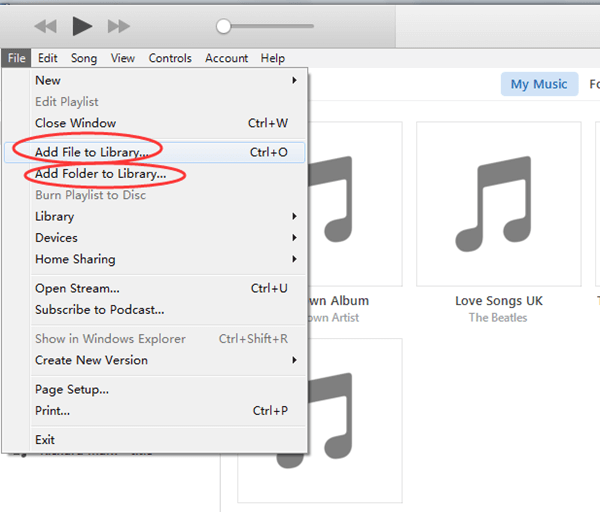
STEP 3. If your songs aren't stored in the iTunes library, click "File" > "Add File to Library"/"Add Folder to Library" to import music to iTunes.
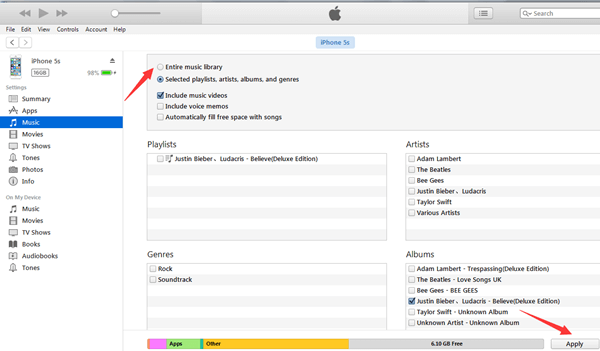
STEP 4. Click the "Phone" icon and select "Entire music library" to transfer all music to your iPhone. Or tick up "Selected playlists, artists, albums, and genres" and then choose the playlist of your desired songs.
STEP 5. Hit the "Apply" button to start transferring music from iTunes to iPhone.
Part 3. Transfer Music from Computer to iPhone without iTunes Syncing
If you don't have a computer around or want to add music from a computer to iPhone without iTunes, there are two more ways to consider. Now, let's get the rope here.
1. Share Music from Mac to iPhone via AirDrop
AirDrop is an easy way to wirelessly transfer songs from a MacBook Air/Pro/mini. It would be convenient if you just want to share a couple of songs. However, it may fail to transfer files from Mac to iPhone if you AirDrop too many songs at a time. Now, let's see how to pass music from computer to iPhone.
STEP 1. Turn on both AirDrop, Wi-Fi, and Bluetooth on iPhone and Mac.
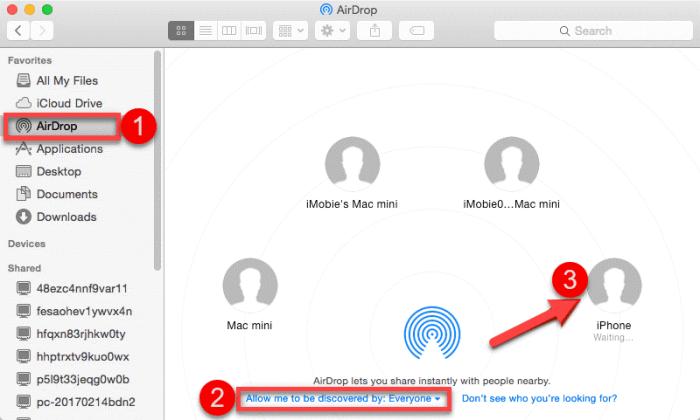
STEP 2. On Mac, launch Finder and click "AirDrop".
STEP 3. Switch to "Allow me to be discovered by: Everyone" and select your iPhone.
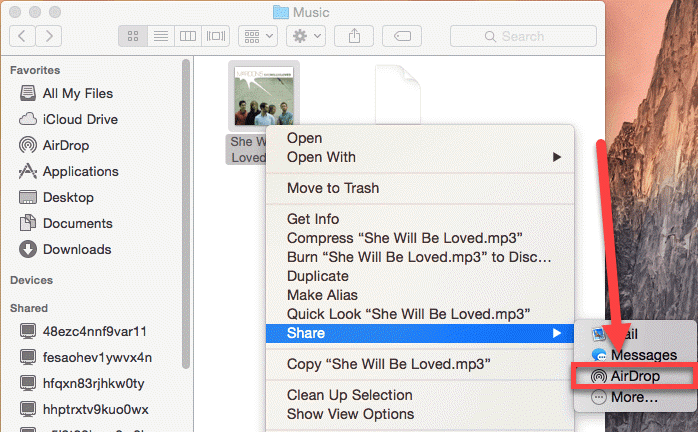
STEP 4. Go to the "Music" folder and select one or more songs. Then, right-click and choose "Share" > "AirDrop".
STEP 5. On your iPhone, tap "Accept" and wait until it's done.
2. Sync Music from Computer to iPhone Using Cloud Services
The final trick is to upload music to Cloud services like Dropbox, OneDrive, Google Drive, iCloud Drive, etc, and then download music to iPhone. However, you can only upload audio tracks rather than songs you downloaded from iTunes or other services. Now, let's see how to download music from computer to iPhone.
STEP 1. Open a cloud service on the browser, for example, Dropbox.
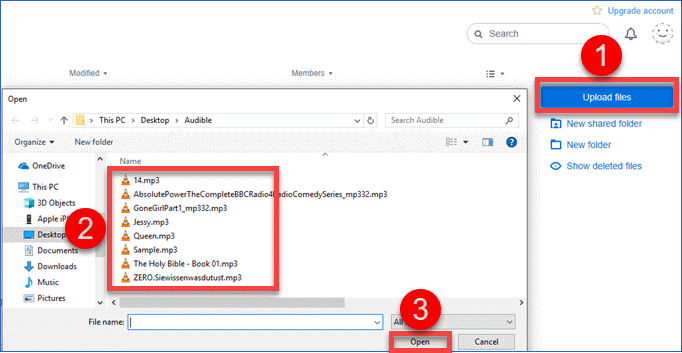
STEP 2. Log in to your account and click "Upload files".
STEP 3. Select songs on your computer and click "Open" to upload music to Dropbox.
STEP 4. Now, download and install Dropbox on your iPhone.
STEP 5. After logging in to the same account, download uploaded songs to your iPhone.
FAQs about Transferring Music from Computer to iPhone
Why can't I transfer music from my computer to my iPhone?
If you fail to transfer music from computer to your iPhone, that may be caused by the following reasons.
- The internet connection is unstable or slow.
- You're transferring too many songs at a time.
- The songs you transfer are DRM protected.
- Your iPhone doesn't have enough storage.
Will transferring music from computer to iPhone erase existing content?
Using iTunes/Finder to transfer music to your iPhone may replace the current music stored on your iPhone, but you can set it to sync music without replacing existing music in the settings. Moreover, if you're using a tool like FonePaw iOS Transfer, then you don't have to worry about that.
Can I transfer music purchased from other sources (non-iTunes) to my iPhone?
Yes, if your purchased songs from other sources are in DRM-free audio formats like MP3, AAC, etc, you can transfer them to your iPhone via the 4 ways above.
Conclusion
Have you got the ideas of how to transfer music from computer to iPhone in 4 ways here? You can give it a go on the preferred method and then enjoy songs on your iPhone. AirDrop is a nice option if you have a Mac. Also, you can sync songs in the iTunes library to your iPhone via iTunes.
If you want to transfer a lot of songs, FonePaw iOS Transfer will be your best partner to quickly fulfill the mission. Better yet, it allows you to easily manage your iPhone and transfer all types of files between devices. Just try it out and see how good it is.


